When it comes to reselling jewelry, high-quality photos can make all the difference. Whether you're selling on eBay, Etsy, Poshmark, or your own website, great images will grab a buyer's attention and increase your chances of making a sale. Since potential buyers can’t physically touch or try on the jewelry, your photos have to do the talking. In this guide, I’ll walk you through how to photograph jewelry for reselling, ensuring your products shine (literally and figuratively!) and sell faster.
1. Gather Your Equipment
You don’t need a fancy DSLR camera to take great jewelry photos. With a bit of creativity and basic tools, you can produce professional-quality images. Here’s what you’ll need:
Camera or smartphone: Modern smartphones have excellent cameras that can handle jewelry photography quite well. However, if you have access to a DSLR or mirrorless camera, even better.
Tripod: A tripod is essential for keeping your camera steady. Jewelry is small, and even the slightest movement can cause blurriness. A phone tripod works well too.
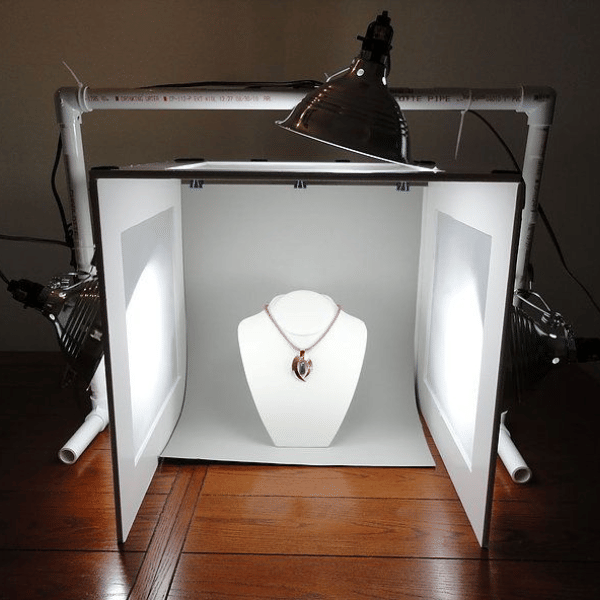
Lighting setup: Good lighting is crucial. Natural light is always a great option, but if you're working indoors, softbox lights or a lightbox will help minimize harsh shadows and provide even lighting.
Background: A clean, non-distracting background allows the jewelry to be the focus. White or light-colored backgrounds are ideal. You can use a piece of white paper, fabric, or a professional backdrop.
Props (optional): Minimalistic props like ring holders or jewelry busts can help show off the pieces without taking away from the jewelry itself.
2. Set Up Your Lighting
Lighting can make or break your photos. Here are some tips to get it right:
Avoid direct sunlight: Direct sunlight can create harsh shadows and reflections. Instead, place your jewelry near a window for natural, diffused light.
Use soft lighting: If you’re using artificial lighting, use softbox lights or a lightbox. These help distribute the light evenly and reduce reflections.
Avoid flash: Flash tends to create glares and can wash out the colors of your jewelry. Stick with soft, continuous lighting.
3. Clean Your Jewelry
Before you start shooting, make sure the jewelry is spotless. Even the smallest speck of dust or smudge will be noticeable in close-up shots. Use a microfiber cloth to gently clean each piece. If necessary, use a jewelry cleaner to remove tarnish or dirt, especially on rings, necklaces, or intricate pieces.
4. Choose the Right Background
When photographing jewelry, you want to highlight the piece and keep distractions to a minimum. Here are some background options:
White background: Clean and professional, a white background makes your jewelry stand out and is easy to achieve with a piece of paper or fabric. Most online marketplaces prefer white backgrounds for product listings.
Textured backgrounds: For a more artistic look, use lightly textured backgrounds like marble, wood, or velvet. Just be careful not to let the background overpower the jewelry.
Lifestyle photos: Show how the jewelry looks when worn. Lifestyle shots can help buyers imagine themselves with the item, increasing the emotional appeal of your listing.
5. Frame Your Shot and Use Angles
Jewelry is all about the details, so make sure you capture them. Here's how:
Get close-up shots: Jewelry is small, and customers will want to see every detail. Use the macro mode on your camera or smartphone, or manually zoom in for detailed shots.
Shoot from multiple angles: Take pictures of the jewelry from different angles—front, side, and back. This will give buyers a complete view of the piece. Include close-ups of important features like clasps, engravings, or gem details.
Show scale: Jewelry can look different in size depending on the shot, so include something in the photo to give buyers a sense of scale. A ring on a finger, a necklace draped on a bust, or earrings next to a coin can help customers visualize the piece in real life.
6. Mind the Reflections
One of the biggest challenges in jewelry photography is dealing with reflections. Here’s how to minimize them:
Position your lights properly: Angling your lights above or to the side of the jewelry can help reduce reflections.
Use a diffuser: If you’re shooting with artificial lights, a diffuser will soften the light and reduce reflections. You can create a DIY diffuser with tissue paper or a translucent white plastic sheet.
Wear neutral clothing: When photographing reflective pieces like silver or gold, your clothing may show up in the reflection. Wear neutral colors, and avoid bright or patterned clothes.
7. Edit Your Photos
Once you've taken your shots, a little editing can take them from good to great. This is completely OPTIONAL! You don’t need advanced software—apps like Adobe Lightroom Mobile or Snapseed offer easy-to-use tools. Focus on:
Brightness and contrast: Make sure the jewelry is well-lit and stands out from the background.
Sharpness: Enhance the details by increasing sharpness slightly, but don’t overdo it as this can make the image look unnatural.
Color accuracy: Ensure the colors of gemstones and metals are accurate. Sometimes lighting can alter the true color, so tweak your image until it matches the real-life appearance of the jewelry.
8. Optimize for the Web
When you upload photos to a reselling platform, keep in mind that images are often resized automatically, which can affect quality. Make sure your photos are:
High resolution: Shoot in the highest resolution your camera allows. Most platforms will compress the images, so starting with a high-res file ensures they look sharp even after compression.
Web-optimized file format: Save your photos in a format like JPEG or PNG, and resize them to fit the platform’s requirements (usually around 1000–2000 pixels on the longest side).
9. Experiment and Practice
Jewelry photography is a skill that improves with practice. Don’t be discouraged if your first few attempts aren’t perfect. Experiment with different angles, lighting setups, and backgrounds until you find a style that works best for your pieces.
With the right techniques, photographing jewelry for reselling can be both fun and profitable. Remember, your photos are often the first (and only) impression a potential buyer will get of your jewelry, so taking the time to create high-quality images will pay off in the long run.
Happy selling!